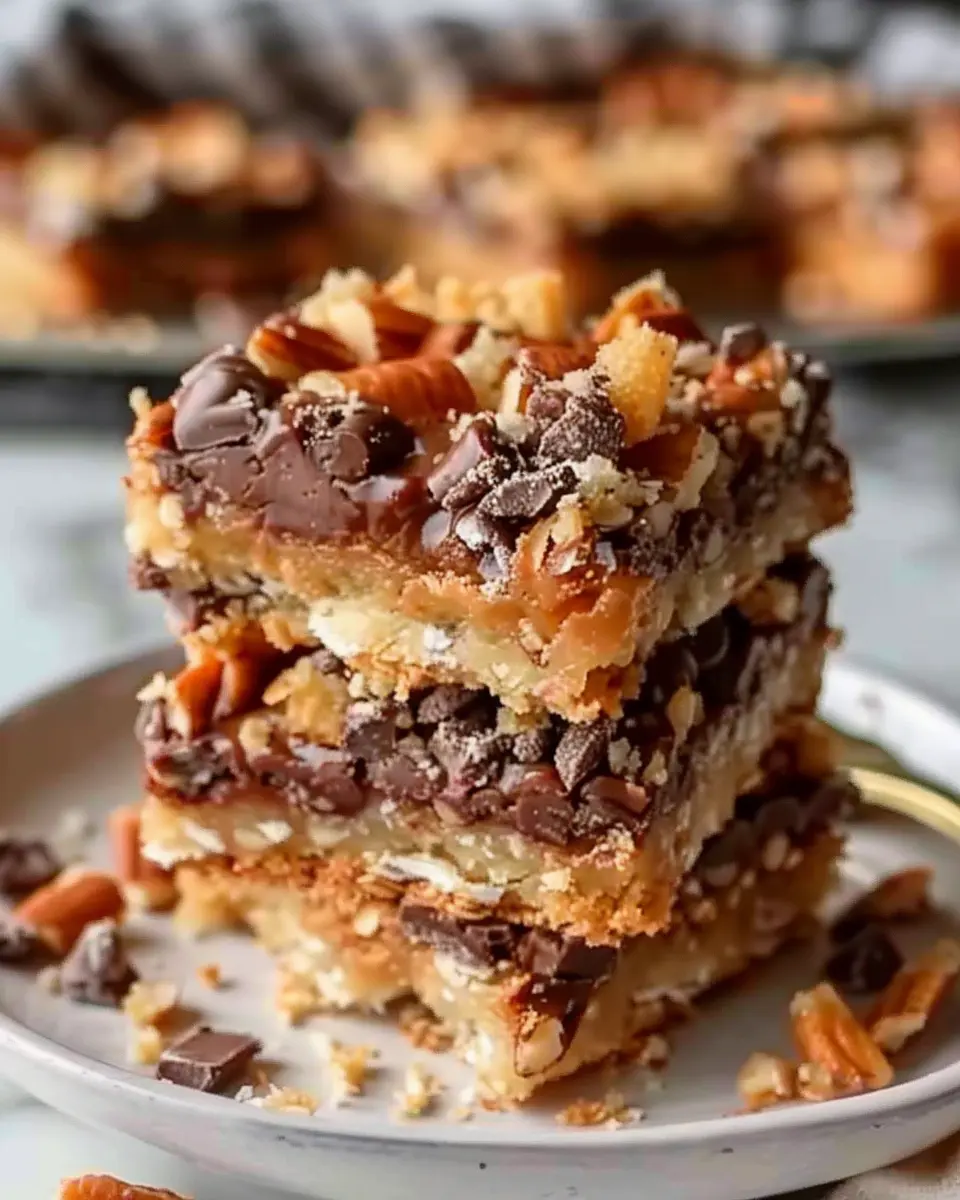
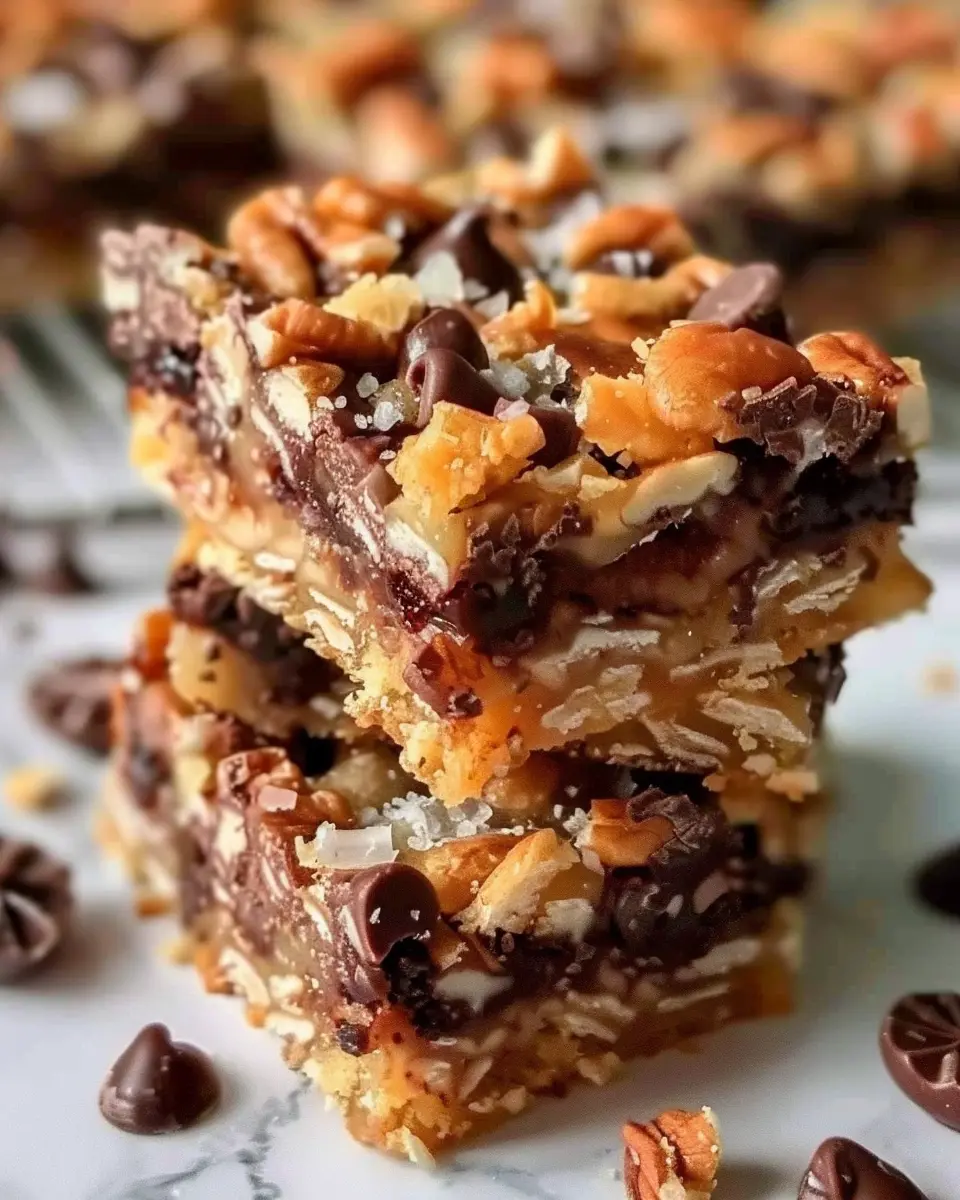
Introduction to 7 Layer Bars
Ever bitten into a dessert that feels like a celebration with every layer? That’s exactly what you get with 7 Layer Bars. This delightful treat has become a beloved staple in homes, potlucks, and bake sales alike, and it’s not hard to see why. With their rich combination of textures and flavors, these bars bring together chocolate, coconut, nuts, and sweetened condensed milk in a heavenly experience that’s both easy to make and hard to resist.
Why Are 7 Layer Bars a Timeless Classic?
The magic of 7 Layer Bars lies in their versatile nature and the ability to cater to various tastes. You can customize the layers to your liking, swapping out nuts or adding your favorite candies. Imagine the excitement of a chocolate lover biting into these gooey wonders, with pecans or walnuts adding that perfect crunch.
But it’s more than just customization. Let’s consider their simplicity. Whether you’re whipping them up for a busy weeknight treat or impressing guests at a gathering, the process is straightforward. Simply layer the ingredients in a pan, pop them in the oven, and voila—you’ve got a dessert that looks as good as it tastes!
A Few Fun Facts About 7 Layer Bars
- Origin: These bars are often considered a classic American dessert, first appearing in recipes in the 1960s. There’s still a bit of debate over their exact origin, but they’ve made a permanent mark in dessert history.
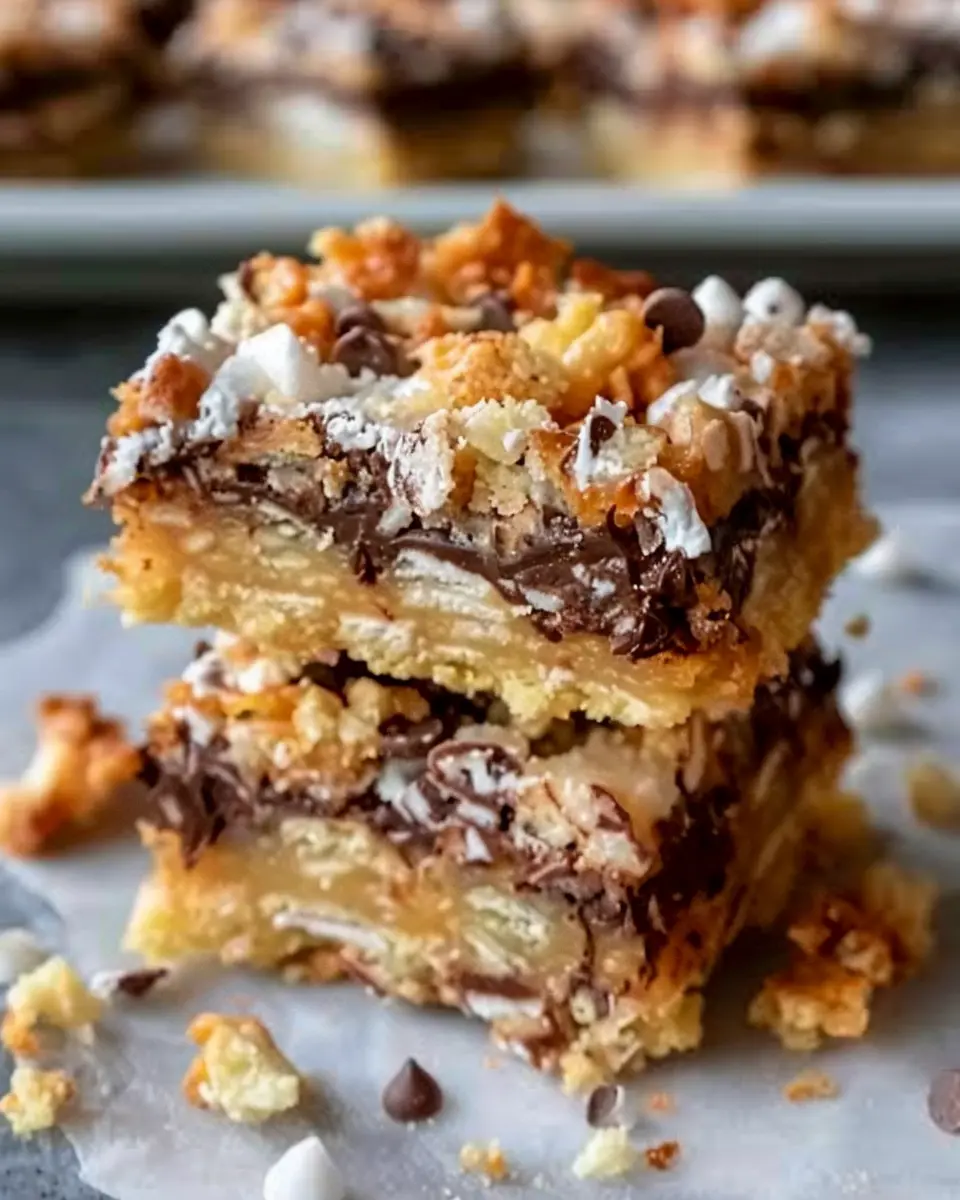
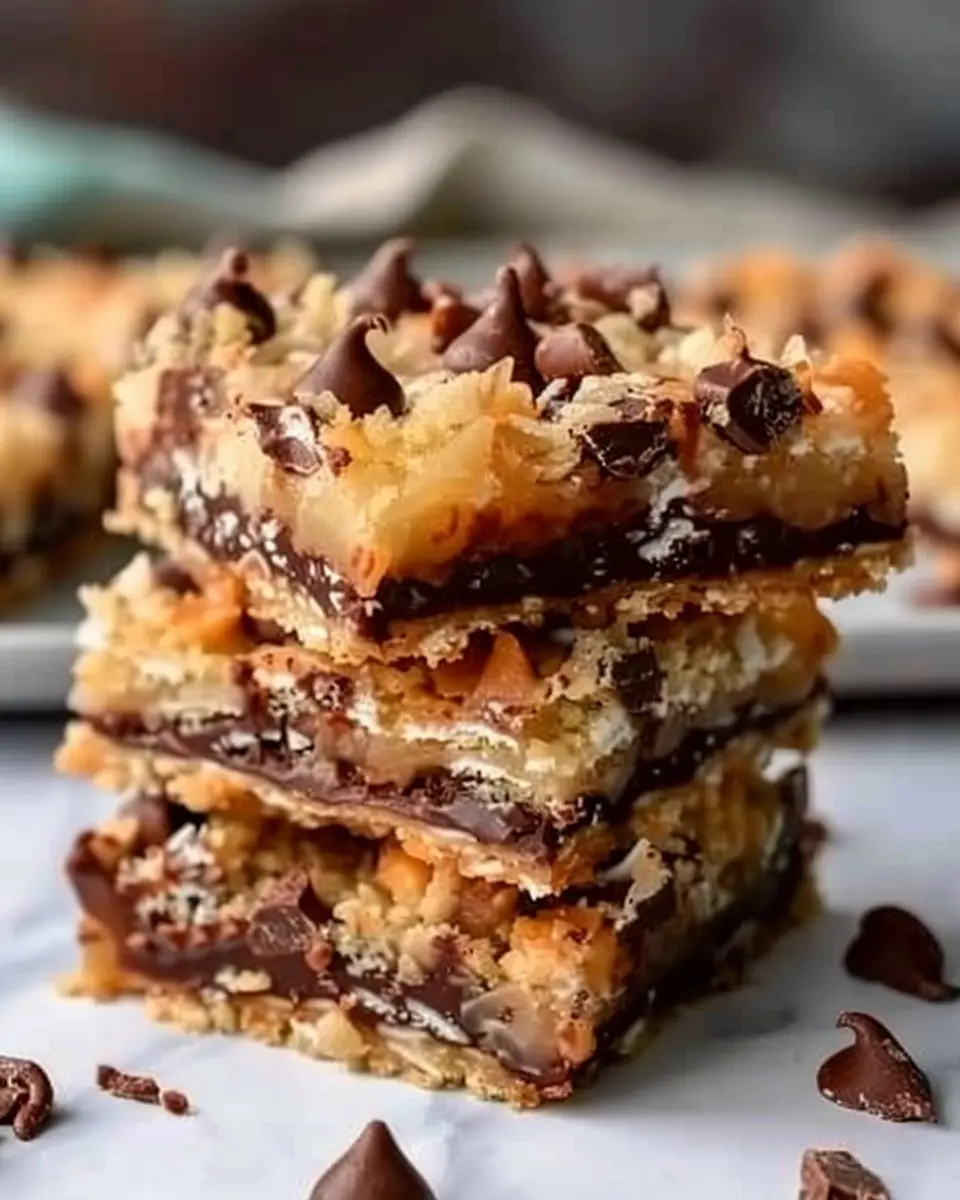
- Layered Delight: True to their name, 7 Layer Bars typically consist of seven distinct layers, each contributing its unique flavor and texture. From the buttery cracker base to the melting chocolate topping, every bite is a journey.
- Make Ahead: One of the best parts? They can be made ahead of time and stored, making them perfect for parties or family gatherings. Just remember to keep them airtight!
So whether you’re a seasoned baker or a newbie looking for something simple yet impressive, 7 Layer Bars are a perfect choice. Get ready to whip up this timeless classic, and let those flavors take you on a delightful journey! For ingredients and a step-by-step guide, check out our full recipe. Don’t forget to explore more about the history of desserts at National Geographic.
Ingredients for 7 Layer Bars
When it comes to the ultimate dessert experience, 7 Layer Bars never fail to impress. Not only do they look stunning, but they also combine a variety of flavors and textures that hit all the right notes. To whip up a batch of these delectable treats, you’ll need the following ingredients:
Essential Components
- Graham Cracker Crumbs: 1 ½ cups for that perfect crunchy base.
- Unsalted Butter: ½ cup, melted. This adds richness and binds the crust together.
- Sweetened Condensed Milk: 1 can (14 oz) brings sweetness and moisture, creating that fudgy texture.
- Chocolate Chips: 1 cup for a rich, chocolatey gooeyness.
- Butterscotch Chips: 1 cup to elevate the caramel flavor profile.
- Shredded Coconut: 1 cup, unsweetened for a tropical twist.
- Chopped Nuts: 1 cup, walnuts or pecans work wonderfully for added crunch.
Optional Add-ons
Feel free to get creative! Consider adding mini marshmallows or a sprinkle of sea salt on top for an exciting finish.
If you’re new to baking or looking for more tips, check out websites like Serious Eats for techniques and tricks that can help enhance your baking skills. Enjoy your time in the kitchen!
Step-by-Step Preparation for 7 Layer Bars
When it comes to indulgent treats, 7 Layer Bars are a classic favorite. These delightful bars are not just aesthetically pleasing with their layers of textures and flavors; they are also incredibly easy to make. Follow these steps, and you’ll have a delicious batch ready to impress friends, family, or even yourself!
Prepare the base
The first step to creating your 7 Layer Bars is to establish a solid foundation, which starts with the crust. For this, you’ll need to gather a few simple ingredients:
- 1 ½ cups of crushed graham crackers
- ½ cup of melted unsalted butter
- ¼ cup of granulated sugar
To start, preheat your oven to 350°F (175°C). In a mixing bowl, combine the crushed graham crackers, melted butter, and granulated sugar. Mix until everything is well incorporated. The mixture should have the consistency of wet sand. Once combined, press this mixture firmly into the bottom of a lined 9×13 inch baking dish. This step is crucial because a well-pressed crust will provide a sturdy base for all the layers to come.
Layer the goodies
Now for the fun part—layering! This is where you can let your creativity shine. The classic 7 Layer Bars consist of several delicious layers, and here’s how to assemble them:
- 1 cup of sweetened shredded coconut: Sprinkle this evenly over the crust to add a chewy texture.
- 1 cup of semi-sweet chocolate chips: These provide that rich chocolaty flavor that we all crave.
- 1 cup of butterscotch chips: If you haven’t tried butterscotch with chocolate yet, you’re in for a treat!
- 1 cup of chopped nuts (optional): Pecans or walnuts work beautifully for added crunch.
- 1 can (14 oz) of sweetened condensed milk: This is the magic ingredient that binds all the layers together and adds sweetness.
Layer each ingredient in a systematic way, ensuring an even spread for each layer. This is your chance to customize based on personal preferences too! Love peanut butter? Sprinkle in some peanut butter chips with the chocolate for a delightful twist!
Pour the magic
With your layers beautifully arranged, it’s time to pour the magic. Gently and evenly drizzle the sweetened condensed milk over the entire surface of the layers. This step not only adds sweetness but also helps meld all the flavors together during baking.
Make sure every corner is covered, as this is what will keep the layers adhered to one another. If you’re feeling adventurous, you might even want to mix in a pinch of sea salt to enhance the flavors.
Bake and cool
Once your layers are ready, pop your 7 Layer Bars into the preheated oven. Allow them to bake for about 25-30 minutes or until the top is golden brown and the edges are bubbly. The aroma wafting through your kitchen will be enough to have everyone asking, “What are you baking?!”
When the bars are ready, remove them from the oven and let them cool in the baking dish on a wire rack. It’s super important to let them cool completely. If you try to cut them while they’re warm, they may fall apart—while delicious, they’re much easier to manage when cooled.
Once cooled, grab a sharp knife and cut them into squares. Now help yourself to a piece (or two) and enjoy!
For more fun recipes and delicious baking tips, check out BakingBetter.com and take your dessert game next level! Happy baking!
Variations on 7 Layer Bars
7 Layer Bars are a delightful dessert that you can customize in numerous ways to match your cravings or dietary preferences. Here are a couple of variations that might just inspire your next kitchen adventure!
Dark Chocolate and Sea Salt Variation
For a gourmet twist on traditional 7 Layer Bars, try incorporating dark chocolate and a sprinkle of sea salt. Start by replacing the usual chocolate chips with high-quality dark chocolate; this will elevate the flavor profile and give that decadent touch.
- Use a mix of semisweet and dark chocolate chips for depth.
- Top your layered creation with a fine dusting of sea salt right before serving to enhance the sweet notes.
The contrast of rich chocolate and savory salt makes every bite unforgettable! If you’re interested in experimenting with different chocolate flavors, check out Serious Eats for more ideas.
Nut-free and Allergy-friendly Variation
If you’re feeding guests with nut allergies, fear not! You can still whip up a batch of delicious 7 Layer Bars that everyone can enjoy. Here’s how:
- Substitute nuts: Instead of pecans or walnuts, use crushed gluten-free graham crackers or crushed oats to create that crunchy base.
- Dairy-free options: Look for dairy-free chocolate chips and coconut milk for the sweetened condensed layer to ensure it’s safe for those with dairy intolerances.
These modifications allow everyone to indulge without worry. It’s always rewarding to see friends enjoying a treat you made with consideration for their dietary needs.
With these variations, your 7 Layer Bars will be even more appealing, whether you’re hosting a party or just indulging in a quirky weeknight treat!
Cooking Tips and Notes for 7 Layer Bars
Creating 7 Layer Bars can be a delightful baking adventure! Here are some helpful tips to ensure your bars turn out fabulously every time.
Use Quality Ingredients
The flavor of 7 Layer Bars relies heavily on the quality of your ingredients. Opt for fresh nuts, high-quality chocolate chips, and real butter for the best taste. Consider organic coconut if you can—it really enhances the flavor!
Layer with Love
When layering, take your time. Evenly spread each layer to ensure every bite delivers the full spectrum of those delicious flavors. This attention to detail will make your 7 Layer Bars truly memorable.
Keep an Eye on Baking Time
Baking time can greatly affect your bars. Overbaking can lead to a dry texture, while underbaking might leave them gooey. Check for a golden-brown top and a slight jiggle in the center; they’ll firm up as they cool.
Cool Before Cutting
Allow your bars to cool completely before cutting. This will make slicing much simpler and help maintain their shape. If you’re looking for neat cuts, chilling them in the fridge for about an hour can be a game-changer.
Serve with a Twist
Serve your 7 Layer Bars with a scoop of vanilla ice cream or a dollop of whipped cream for an extra treat. If you’re feeling adventurous, try pairing them with a homemade caramel or chocolate sauce!
For more baking tips, check out resources such as King Arthur Baking and Food Network for expert advice and inspiration. Happy baking!
Serving Suggestions for 7 Layer Bars
When it comes to indulging in 7 Layer Bars, the serving options are as delightful as the dessert itself. Whether you’re planning a cozy night in or a lively gathering, these rich treats can elevate any occasion.
Perfect Pairings
Consider serving your 7 Layer Bars with:
- Coffee or Tea: The robust flavors of coffee or a soothing herbal tea can beautifully balance the sweetness of the bars. Try a mocha or chai for an extra kick!
- Ice Cream: A scoop of vanilla or caramel ice cream adds a delightful creaminess, creating a decadent dessert that guests will love.
- Fresh Berries: Fresh raspberries or strawberries offer a tart contrast that can cut through the richness, making for a well-rounded treat.
Presentation Tips
For a visually appealing setup:
- Layered Plates: Stack the bars on a multi-tiered cake stand to make them the star of the show.
- Garnishes: Add a sprinkle of powdered sugar or a drizzle of chocolate sauce to elevate the look and flavor.
These suggestions not only make your 7 Layer Bars more enjoyable but also impress your friends and family. For more great ideas, check out resources like Taste of Home and Food Network for unique twists and variations!
Time Breakdown for 7 Layer Bars
When you’re craving a sweet treat, these 7 Layer Bars are a fantastic option. Let’s take a closer look at the time involved so you can plan your baking adventure effectively.
Preparation time
Getting your ingredients together and mixing them for these 7 Layer Bars will take about 15 minutes. It’s a pretty straightforward process—just layer and pour!
Baking time
Once your creation is prepped, it needs to bake for 30 minutes. You’ll want to keep an eye on it and ensure those layers are all coming together beautifully.
Total time
In total, you’re looking at about 45 minutes from start to finish. That includes both preparation and baking time—easy enough to squeeze into any busy schedule! Why not enjoy these delicious bars while scrolling through your favorite baking blogs, like Serious Eats? You can discover tips and tricks for other mouthwatering treats!
Happy baking!
Nutritional Facts for 7 Layer Bars
Calories
When indulging in 7 Layer Bars, it’s helpful to know what you’re putting in your body. On average, a single bar packs around 250-300 calories. While they’re a delightful treat, being aware of the calorie count can help you enjoy them in moderation. It’s easy to get carried away with their luscious layers, so perhaps share a piece with a friend!
Key Nutrients
These bars not only satisfy your sweet tooth but also offer some nutritional benefits:
- Carbohydrates: The primary fuel source, essential for energy.
- Fats: Coming mainly from the layers of coconut and chocolate, fats provide satiety and flavor.
- Fiber: Many variations incorporate nuts, adding a nice fiber boost to your treat.
- Protein: Depending on your recipe, you can get a protein kick from added nuts or peanut butter.
For a deeper dive into nutritional values, consider checking resources like the USDA FoodData Central. Remember, moderation is key, and these bars can be a fun addition to your dessert rotation!
FAQs about 7 Layer Bars
Can I use different types of chips in 7 Layer Bars?
Absolutely! One of the best things about 7 Layer Bars is their versatility. While the classic recipe typically calls for chocolate chips, feel free to experiment with other varieties. Butterscotch, white chocolate, or even peanut butter chips can elevate the flavor profile and make your bars unique. Have a favorite chip? Go ahead and toss it in! For more ideas, check out this chocolate chip varieties guide.
How do I store 7 Layer Bars for freshness?
To ensure your 7 Layer Bars stay fresh, store them in an airtight container. If you need to keep them for longer, it’s a great idea to layer parchment paper between the bars to prevent them from sticking together. You can keep them at room temperature for about a week, or refrigerate them for up to two weeks. If you’re looking to extend that shelf-life even further, consider freezing them. Just wrap them in plastic wrap and place them in a freezer-safe bag. They can last for up to three months in the freezer—perfect for a treat later!
What’s the best way to cut 7 Layer Bars?
Cutting 7 Layer Bars can be a little tricky due to their gooey layers. One handy tip is to use a sharp knife that’s been dipped in hot water—this helps the knife glide through the layers smoothly. Aim for square or rectangle pieces, about 1 to 2 inches, depending on your preferred portion size. For an interesting twist, you might try drizzle melted chocolate on top for a fancy finish when serving. Enjoy your bar journey!
Conclusion on 7 Layer Bars
In conclusion, making 7 Layer Bars is more than just baking; it’s about creating a delicious, layered masterpiece that brings joy to any gathering. These bars, with their rich combination of flavors—from crunchy nuts to sweet chocolate—are sure to impress your friends and family.
Once you’ve mastered the basics, feel free to experiment with different ingredients or add your personal touch. Whether you choose to serve them at a party or enjoy them as a midday snack, 7 Layer Bars are a guaranteed crowd-pleaser. So go ahead, whip up a batch, and indulge in this delightful treat that beautifully blends textures and flavors.
For more baking inspiration, check out The Kitchn or Food Network.
Print7 Layer Bars: Indulgent Treat for Your Next Gathering
Delight your guests with these 7 Layer Bars, a rich and sweet dessert featuring seven delicious layers of flavor.
- Prep Time: 20 minutes
- Cook Time: 30 minutes
- Total Time: 50 minutes
- Yield: 24 bars 1x
- Category: Dessert
- Method: Baking
- Cuisine: American
- Diet: Vegetarian
Ingredients
- 1 cup graham cracker crumbs
- 1/2 cup unsalted butter, melted
- 1 cup sweetened shredded coconut
- 1 cup semi-sweet chocolate chips
- 1 cup butterscotch chips
- 1 can (15 oz) sweetened condensed milk
- 3/4 cup chopped nuts (walnuts or pecans)
Instructions
- Preheat your oven to 350°F (175°C).
- In a mixing bowl, combine graham cracker crumbs and melted butter, then press into the bottom of a 9×13 inch baking pan.
- Layer the shredded coconut evenly over the crust.
- Sprinkle the chocolate chips over the coconut layer.
- Add butterscotch chips on top of the chocolate chips.
- Drizzle the sweetened condensed milk over the entire mixture.
- Top with chopped nuts.
- Bake for 25-30 minutes until the edges are golden brown.
- Allow to cool before cutting into bars.
Notes
- For extra flavor, consider adding a layer of peanut butter chips.
- Serve with vanilla ice cream for an extra indulgent dessert.
Nutrition
- Serving Size: 1 bar
- Calories: 200
- Sugar: 14g
- Sodium: 75mg
- Fat: 9g
- Saturated Fat: 5g
- Carbohydrates: 27g
- Fiber: 1g
- Protein: 2g
- Cholesterol: 15mg
Keywords: 7 Layer Bars, dessert, sweet treat, gathering